
FURMAX is one of the manufacturers of affordable ergonomic gaming chairs. It also has a line of racy car type of gaming chairs. But if you’re on the lookout for a gaming chair that can be used both for work and play, FURMAX also offers a sleeker and more subtly designed chair.
- BestOffice PC Gaming Chair Review: Is the Price Too Good To Be True?
- Respawn Gaming Chairs: Which One is the Best & why it’s worth your money
Let’s take a look at one of the more discreetly designed FURMAX gaming chairs. This model looks different from what you’re used to seeing in a gaming chair. Does it work? Keep reading.
Standingdesktopper's pick
Furmax Office Gaming chair – The good bits

![]()
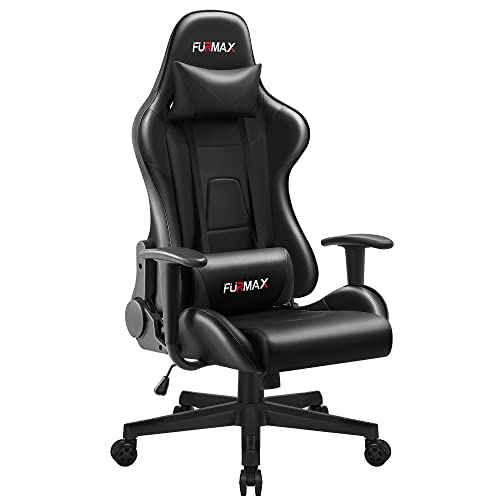
Aesthetics
It’s a gaming chair that looks sleek and simple. Out of all the other gaming chairs of Furmax, this has the most subtle design. It’s straightforward and simple that you can even use it as an office chair.
If you are not into the racy look of gaming chairs, you’ll probably love this FURMAX unit. And the all-black leather exterior can complement any workspace, it can easily blend in.
Comfortable backrest and armrests
This FURMAX gaming chair is rather comfortable. Though We were hoping that the center part of the seat was padded a bit more, we found the back seat and the armrest quite comfortable.
The backrest feels nice on the back. It has great lumbar support. And though it isn’t adjustable, it can cradle your back in the right way. So even if you sat for long hours, you won’t have back soreness or numbness.
The armrests, on the other hand, are sufficiently padded. It’s quite thick actually. The combination of the PU leather and mesh upholstery did this gaming chair well. This also makes the chair easy to clean and more breathable.
And you can also recline the chair a bit. Though it isn’t lockable so you won’t be able to sleep on it. But still, it can offer you a change in the angle, which is what you need if you’ve been sitting on a chair for long hours. We also love how we were able to rock the chair back and forth.
Quick and easy assembly
It took one of us to set up the chair in 15 minutes. You will not really need help in putting it, it’s a fairly easy job. The chair is not too heavy so you can do it on your own. The instructions were clear and all the parts and accessories needed for the assembly are in the box.
Though we have heard of complaints that some customers received their purchase with no instruction manuals in it. So this is a matter of QA.
Wide seat
This FURMAX gaming chair is quite wide. So if you are heavy around the waist, you won’t feel cramped in his one. And if you are skinny or of average size, you have more room to move around in this chair.
Upgraded wheels
The caster wheels roll seamlessly on hardwood floors without scratching or marring them. They also don’t make irritating squeaks or noise when you’re moving from one desk to another. It’s because the wheels are also covered with PU rubber, hence it can slide effortlessly. That’s a plus because you do not need to pay extra for special wheels just to have them rolling smoothly on your expensive hardwood floors.
The price is so great
See the greatest price here: https://amzn.to/35LV6PS
What you will not like about the chair
Not the most durable
This is one of those CHINA made chairs that can only last for, say a year. The low cost of construction and material will catch up on you. We have used this chair for over a year, and that’s when it started to deteriorate.
The PU leather covering started to peel off, both on the backrest, seat, and armrests. And once it starts to peel off, you won’t be able to stop it. There is nothing you can do at this point to salvage the chair.
Weight capacity falsely presented
This FURMAX gaming chair is advertised to accommodate a maximum of 280 lbs. You would not try it if you were us. Though it can be decently stable for the first few months of use, but only for those who are of average weight. Anyone who weighs 280 lbs or near this figure, will find that the chair will start to creak. That’s the sound of the screws slowly getting loose.
The brand should have just rated it lower for the safety of its consumers. So remember this, if you weigh more than 200 lbs, do not sit on this chair if you don’t want to break your back.
Not for the tall and heavy
So we have mentioned that this is not for heavy-duty. Nor is it for taller users or those who have a longer torso. This is a mid-back chair. So if you’re tall or have a longer torso, it might not be high enough to support your entire back. So if you still insist on using this chair, you’ll end up with a sore back and a stiff neck.
And the seat height’s max range is 19.69 inches, so there’s no way for taller users to be comfortable in it.
Preferably a more cushioned central seat
Out of the box, the cushion seems to have thick padding that measures 3-4 inches. But here’s the thing. Yes, the cushioned seat is thickly padded and it’s about 3-4 inches. But the center part of the seat where your butt lands are made of more of a mesh material. We suppose this is to help make the chair breathable. But if you have been sitting for a long time, you will wish it is also thickly padded. Well, for us that is.
Yes, it does help with breathability so your thighs won’t sweat too much. But the comfort might be compromised.
No head support
Since it’s a mid-back chair, you might be missing the head support that the high back gaming chairs offer. So it’s not for you if head or neck support is essential for you.
Summary of Furmax Office Chair
- In terms of comfort, we have to give it to this FURMAX chair. For its price point, it’s rather comfortable. It’s well-padded, except for the central part of the seat. You’ll appreciate the nice lumbar support and the padded armrests. That’s why you can use this office chair for long hours.
- And since it has a subtle and sleek design, it does not look too gamey. This is what sets it apart from other racing car types of gaming chairs of the brand. Thus, you can easily substitute this for an office chair. That makes this unit more versatile than other gaming chair models of FURMAX.
- It’s ergonomic and offers several adjustable options that will make you more comfortable. The rocking motions, the angled tilt, and the full 360-degree swivel are nice to have.
- Yes, this chair is quite comfortable out of the box. But as we have revealed above, this can only last for a while. We’re giving it a year. The low cost of manufacturing and parts, ultimately will result in a shorter life span.
So expect this chair to wither thought after the first year. From the peeling of the PU leather material to loose screws, this will render the chair unusable after a year.
- The chair isn’t for the tall and heavy. Though it has a weight capacity of 280 lbs, we discovered that it will not be able to bear this weight. Otherwise, you might risk breaking your back should the chair collapse. And since it’s a mid-back chair taller users will not find it suitable.
- So those who are of average size or petite and lightweight users will find this chair the most comfortable. But then again, even if you are lighter, this chair will still have a short lifespan. So if you are in the market for a durable gaming chair, this is not it.
- It has a rather affordable price tag and when coupled with the comfort, one would have to decide on what their priority is. Are you going for an affordable and comfortable chair or you’ll save up to buy a more durable gaming chair that can last for more than a year?
- This can be an option for those who are just venturing into the gaming realm while experienced gamers will be looking for a gaming chair with more bells and whistles. And of course, durability will also be a primary concern since pro gamers are already invested in their craft. It’s a hassle to buy a new gaming chair every year. So they’ll be looking for one with more bang for their buck.
- The brand offers a 30-day money-back guarantee. So you can still return it should it not suit you. But the warranty is quite stingy. FURMAX only offers a 6 month warranty period. So if we are to do the math, durability is indirectly proportional to the amount of warranty period a brand offers.
Furmax office chair assembly – How to finish in 5 minutes
The instruction manual of FURMAX gaming chairs is mostly in illustrations. So these are not words, instead, it contains pictures that explain which part connects to what. All gaming chair models of the brand are quite easy to install. But if you abhor illustrations and need to put everything into words, our simple guide will show you how.
Step 1
The illustrated manual will show all the parts that you need for the setup. Take time to check each one if you have them in the box. It will be frustrating to discover that you are missing some washers and screws whilst in the middle of installing the chair.
The brand did a good job of making sure everything is in the box. But of course, there are still instances where a few screws might be missing. So never push through with the assembly process less you have checked that all the parts and accessories have been shipped to you.
The drawing will mimic the parts so you don’t have to know what each accessory is called. So it’s more convenient for checking.
Step 2
Lay everything on the floor so that you’ll find it easier to cross-check. The screws and all of the smaller accessories come in packs so they will not get lost. So cross-checking will only take just a few minutes of your time.
Step 3
Now that you have checked everything, it’s time to assemble this gaming chair. We’ve mentioned earlier that the small parts come in separate packages right? So open each package, lay them on the floor and label each correctly. It’s a good idea to place the small parts on white bond paper and label how many pieces of each are needed. This way, it’s easy to pick up the pieces when you’re setting it up.
Step 4
The first part of the assembly is setting up the wheels to the base. This consists of the 5 caster wheels, the base, the part that will connect the bad to the legs to the seat, and its cover. Pop each wheel to the hole underneath the base.
You might need to push it a bit to lock it in place. The wheels are removable but it won’t easily just fall out of the holes. You need to use enough pressure to remove each wheel. That’s a good thing. It means that the wheels will not just fall out of place whenever you lift the chair.
Then get the pneumatic cylinder and its cover. This will connect the base of the legs to the bottom part of the seat. Pop the pneumatic cylinder in its cover. And make sure that the orange dot is facing upwards.
Step 5
Now onto the next step. We’ll be needing the seat, the mechanism with the lever that will adjust the seat height, and several screws and connecting pieces.
You will know where the front part of the seat is, it’s labeled as “front”. The mechanism that will adjust the seat height is also labeled accordingly so you will not get lost.
Lay the seat on the floor with the front side facing up. Attach the mechanism to the seat. Make sure that the front side of the mechanism points directly to the part of the seat that’s labeled “front”. So the lever will be facing opposite the front side. Grab the screws and connecting pieces that you need to secure the mechanism to the seat.
The order that you’re going to put the connecting parts is indicated in the illustration. Make sure to follow it as listed. Screw in the connecting parts. You may hand screw it first to ensure that all the screws are aligned with the holes.
Once everything is good, you can now tighten the connections using an Allen wrench. It’s also included in the box.
Step 6
Turn over the seat. Connect the hole under the seat to the orang point of the pneumonia cylinder that’s connected to the base of the wheels. Push it in and it will automatically pop it in place. So when you lift the seat it will not come off. Lifting the seat will help you check if the connection was locked in place. If it falls off, you did not push it hard enough.
Step 7
This step involves attaching the arms to the seat. You need the two armrests and the connecting parts.
Before you go ahead, make sure that the seat is facing the front. Remember the label on the seat that we have mentioned earlier? Check for that underneath the seat.
Pick up the armrest. If you will check the backside of the armrest has 2 compartments. Make sure that you’re going to connect these two holes to the back part of the seat. The glossy part of the armrest must be facing outside too. Get the screws and attach the armrest to the seat. Use the Allen wrench to tighten the screw but make sure first that the holes are aligned. Otherwise, you will have to unscrew each.
Step 8
Now that you have attached the two armrests, we’ll be connecting the backrest to the seat. So grab the backrest and the required connecting parts.
Hold the backrest in place. There will be two holes on the backrest that will fit into the two holes on the back part of the armrests.
If you can have someone to hold the backrest for you while you connect the screws, that will make things easier for you. This may be the most challenging part of the assembly, especially if you’re doing it alone.
Remember to hand screw first or lightly screw it in using the Allen wrench. Then check if the screw holes are aligned before tightening every connection.
Step 9
The last step involves putting the caps that cover the holes on the armrests.
Common queries regarding the installation
- How do you ensure that you’re setting up the seat with the lever for adjusting the seat height properly?
As we have mentioned before, the seat has a label that shows you where the front side of the seat is. Just look for the sticker that says “front.” So when you connect the mechanism with the lever, the front part of the mechanism should align with the front side of the seat.
- How do you align the armrests properly?
A lot of users often encounter this problem since it’s the most complex part of the assembly. Aligning the screw holes can be hard for some. The key is to not tighten the bolt yet unless you’re sure everything is properly fitted. In this way, it would be easy to readjust if the holes don’t seem to be aligned. Patience may be required in this step.
- How do you unload the gas lift?
This is how you adjust the seat height. You’ll be needing a trusty old hammer for this one.
So hold the chair, lift it up, and turn it around. Hammer the round part of the base where the legs are connected.
- What to do if the chair seems uneven?
If you feel that there’s a tilt or the chair isn’t even, it could be because one of the connections is too tight.
It’s better to check the alignment of the chair before you put on the caps that cover the holes on the armrests. Because once you put on the caps, it would be difficult to readjust the chair,
So all you have to do is loosen each connection and tighten them again. This time, ensure that both sides are tightened evenly.
Setting up a FURMAX gaming chair is quite easy, but always remember that if you feel the need to ask for help, do so. It will make your life easier and there’s nothing wrong with asking for help.
Final say
If comfort and price point are a big priority, this chair can be of use to you. Just keep in mind that like most China-made gaming and office chairs, this is not built to last. So if you want a gaming chair that can tick all the boxes in your list, save more bucks and buy a more durable gaming chair.
You might want to take a look at FURNIWELL or a SMUGCHAIR gaming chair. These are also subtly and discreetly designed so they can also double as an office chair. Add a few more digits and you can take it home with you.


")


 for a heavy person")


